


Bulk Pricing
USB2 to 8-Port RS232-422-485 Serial TB Adapter
15KV ESD and 600W Surge Protection for RS-232/422/485 Ports
Our series of Industrial USB 2.0 to terminal block serial adapters supports RS-232, RS-422, and RS485 electrical protection per port and are designed with the user in mind.
- Supports 15KV ESD protection and 600W surge protection for all 8 serial signals
- Uses FTDI FT4232H USB 2.0 to quad UART chip
- Incorporates DIP switch control over each individual port.
- Per port protection from ESD and Surge Protection.
Description
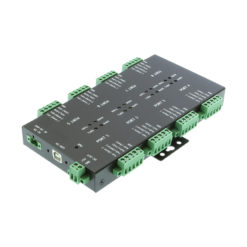
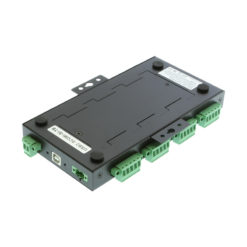
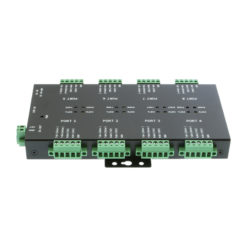
8 RS-232/422/485 ports via terminal block connection
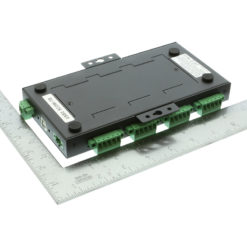
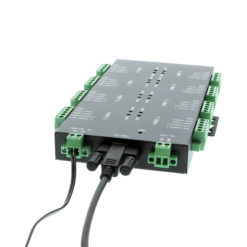
The USB2-8COMi-TB is a USB2 to 8-port industrial serial adapter that protects your device(s) with 15KV ESD protection and 600W surge protection over each port. It is designed to make RS-422 and RS-485 serial port expansion quick and simple through its terminal block connections. Port signals are controlled by DIP switches as is the control over termination and biasing.
Each serial port terminal block can be individually designated for the signal your application demands. The USB 2 to 8-port serial adapter has an industrial designed metal case where the DIP switches are located within the bottom metal access panel.
By connecting to the USB port on your computer or available USB hub, the USB2 to 8-port industrial serial adapter instantly adds eight RS-232/422/485 serial communication ports to your system while taking advantage of both the Plug-and-Play, and Hot-Plug features of the USB bus.
The USB2-8COMi-TB industrial serial adapter makes it very easy to add 8 industrial communication ports to your system though its terminal block interface with DIP switch controls.
Product Features
- Adds eight high-speed RS-232/422/485 serial ports via USB connection.
- 2K byte receive buffer.
- 2K byte transmit buffer for high speed data throughput.
- Requires no IRQ, DMA, I/O port.
- Data rates: 300 bps to 921.6K bps.
- Each serial port supports 5-pin screw-lock-type terminal block connector.
- Auto-transmit buffer control for 2-wire RS-485 half-duplex operation.
- Biasing and Termination resistors installed on-board.
- Supports RS-232 3-wire signals: RxD, TxD, GND
- Supports RS-422, RS-485 4-wire signals: TxD-, TxD+, RxD+, RxD-
- Supports RS-485 2-wire signals: data-, data+
- Monitor LEDS of TxD, RxD indicating port status
- 15KV ESD protection and 600W surge protection for all serial signals
- Virtual COM port drivers available for Windows 11, 10, 8, 7
- Industrial grade metal case with DIN-rail ears for Din-rail mounting.
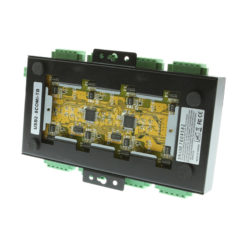
- Chipset: Genesys GT852G 4-port USB 2.0 hub chip + FTDI FT4232H USB 2.0 to quad UART chip
- Dimensions: 192.42 x 122.22 x 23.60 mm (L×W×H), dimensions are to DIN rail(W), to power plug(L)
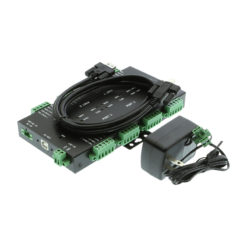
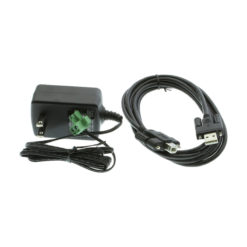
Package Contents
- USB2-8COMi-TB serial adapter
- 2 pin Phoenix connector
- Power adapter
- USB cable
*Surface Mounting screws not included.
Specifications
Product Specifications
| Power |
| ||||||||
|---|---|---|---|---|---|---|---|---|---|
| Compliance |
| ||||||||
| Physical Characteristics |
| ||||||||
| Serial Attributes |
| ||||||||
| Software |
| ||||||||
| Environmental |
| ||||||||
| Hardware |
| ||||||||
| Performance & Safety |
| ||||||||
| Other Data |
|
Technical
| Serial Ports | 8 RS-232, RS-422, RS-485 Ports | ||
| RS-232 Signals | TxD, RxD, GND | ||
| RS-422 Signals | TxD-, TxD+, RxD+, RxD- | ||
| RS-485 Signals | TxD-, TxD+, RxD+, RxD-, GND (4 wire) Data-, Data+, GND (2 wire) |
||
| Connectors | Eight 5-pin screw-lock-type terminal block connectors | ||
| Protection | 15KV ESD protection and 600W surge protection for all serial signals | ||
| Chipset | Genesys GT852G 4-port USB 2.0 hub chip + FTDI FT4232H USB 2.0 to quad UART chip | ||
| Environmental | Operating Temperature: 0°C to 60°C | ||
| Storage Temperature: -40°C to 85°C | |||
| Humidity: 0 to 80% RH. Non-condensing | |||
| Safety Approvals: CE, FCC | |||
| RS-232 Pin-out for 5-pin Screw-Lock-Type Terminal Block connector | |||
| Pin Name | Pin Type | Desciption | |
| TxD- (Data-) | X | No Function | |
| TxD+(Data+) | X | No Function | |
| RxD+ (TxD) | Output | TxD : Transmit RS-232 Data | |
| RxD- (RxD) | Input | RxD : Receive RS-232 Data | |
| GND | Ground | GND : Signal Ground | |
| RS-422 Pin-out for 5-Pin Screw-Lock-Type Terminal Block Connector | |||
| Pin Name | Pin Type | Description | |
| TxD- (Data-) | Output | TxD- : Transmit RS-422 Data, negative polarity | |
| TxD+(Data+) | Output | TxD+ : Transmit RS-422 Data, positive polarity | |
| RxD+ (TxD) | Input | RxD+ : Receive RS-485 Data, positive polarity | |
| RxD- (RxD) | Input | RxD- : Receive RS-485 Data, negative polarity | |
| GND | Ground | GND : Signal Ground | |
| RS-485 Full Duplex (4 Wire) Pin-out for 5-Pin Screw-Lock-Type Terminal Block Connector | |||
| Pin Name | Pin Type | Description | |
| TxD- (Data-) | Output | TxD- : Transmit RS-485 Data, negative polarity | |
| TxD+(Data+) | Output | TxD+ : Transmit RS-485 Data, positive polarity | |
| RxD+ (TxD) | Input | RxD+ : Receive RS-485 Data, positive polarity | |
| RxD- (RxD) | Input | RxD- : Receive RS-485 Data, negative polarity | |
| GND | Ground | GND : Signal Ground | |
| RS-485 Half Duplex (2 Wire) Pin-out for 5-Pin Screw-Lock-Type Terminal Block Connector | |||
| Pin Name | Pin Type | Description | |
| TxD- (Data-) | Output/Input | Data- : Transmit/Receive RS-485 Data, negative polarity | |
| TxD+(Data+) | Output/Input | Data+ : Transmit/Receive RS-485 Data, positive polarity; | |
| RxD+ (TxD) | X | No Function | |
| RxD- (RxD) | X | No Function | |
| GND | Ground | ||
Reviews (0)
Be the first to review “USB2 to 8-Port RS232-422-485 Serial TB Adapter”
Optional Accessories
Optional; Accessories
The 8-Port RS232-422-485 Serial TB Adapter has certain accessories that work with it. These accessories are what you can order if needed.


Out of stock
USB 2.0 Cable - Screw Lock Cable Our Screw Lock USB cables are designed and manufactured to be the best your money can get and…
Model# SC-U3MAB
$13.95EOL - Discontinued
Replacement Parts
Replacement Parts
Did you misplace or break a part that came with your 8-Port RS232-422-485 Serial TB Adapter? Purchase it here!

Replacement 2-Pin Power Connector for CoolGear USB 3.0 Hubs such as USBG-7U3ML.
Model# CG-2PPW
$2.95In stock
USB 2.0 Cable - Screw Lock Cable Our Screw Lock USB cables are designed and manufactured to be the best your money can get and…
Model# SC-U2MAB
$8.95Not in stock - Backorder allowed
Support
Product Documentation & Drivers
Product Documentation
Need drawings, CAD files, or other compliance documentation? Click HERE
Serial F.A.Q.
Product F.A.Q.
View frequently asked product questions below. For all serial troubleshooting, visit this page.
Still need help? Reach out!
-
How do I clean and reinstall my FTDI drivers?
View Answer
-
- Download the CDM Uninstaller HERE.
- Extract the zip file, or open the “CDMuninstallerGUI.exe” utility.
- Leave the ‘Vendor ID’ set to 0403 and ‘Product ID’ set to 6001.
- Click Add.
- Click Remove Devices.
- Download the corresponding driver for your operating system and follow on-screen prompts. Windows Driver | MacOS Driver
-
-
How can I change my device’s COM port?
View Answer
-
- Click on Start and navigate to the Control Panel
- Locate and click on Device Manager
- Under “Ports (COM & LPT)” you will find your serial device titled “USB Serial Port” along with its current COM Port.
- Right click on “USB Serial Port” and click on Properties.
- Navigate to the “Port Settings” tab and click on “Advanced…”
- Once there, the “COM Port Number:” can be changed with a dropdown menu to select the port number.
- Click your desired port number (i.e. COM2) and click “OK”.
- Click “OK” once more.
- Your serial device is now assigned to your chosen COM Port.
-
-
How do I check to ensure the COM port is listed properly in Windows?
View AnswerTo ensure your serial device is installed properly, complete the following:
- Press Windows Key + R to open the Device Manager. Once Run comes up, type “devmgmt.msc” into the text field and press Enter.
- Expand the section labeled, Ports (COM & LPT).
- You should now see a COM number in brackets to the right of each port. If the device is installed properly, no exclamation points or question marks should be present next to the device.
-
I have everything hooked up, but nothing is functioning correctly.
View AnswerTo rule out potential issues, quickly test your individual components to ensure that they are working correctly individually, and are not the source of the problem:
- Serial cables
- Serial ports
- Serial devices
Test your components by:
- Hook up the serial cable(s), serial port(s), and serial device(s) in a different setup to see if the issue stems from a particular component, or the setup as a whole.
- Replace the serial cable, port, or device within your setup to further troubleshoot the issue’s origin.
When testing cables:
- Test each cable individually.
- Use short cables when you are testing.
When testing serial ports and devices:
- Press the Windows key + R, in Run, type devmgmt.msc, and press Enter to open the Device Manager. You can then check to see if your device is listed under Ports (COM & LPT).
- Ensure that the COM port number is the correct number for the serial device and that the software being used to connect the computer to the serial device uses the correct COM port number.
- If the device is listed with an error, follow the instructions on the website to reinstall the drivers.
-
Serial communication is not functioning correctly, how can I tell if the problem caused by the adapter or my serial software application?
View AnswerOlder serial communication applications make use of legacy hardware addresses, often incompatible with PCI, PCIe, and USB to Serial products. Contact the software provider to troubleshoot.
-
I am receiving an error when I try to install the drivers in Windows 8 64 bit.
View AnswerDriver Signature Enforcement in Windows 8 may need to be disabled in order to use various drivers. After disabling this feature, the driver will be allowed to install.
Note: You are required to restart your computer after disabling the Driver Signature Enforcement. Save all open work on your computer.
Disable driver signature enforcement:
- Press the Windows key + C.
- Click Settings > Change PC Settings.
- In the left pane, click General.
- In the right pane, under Advanced startup, click Restart now.
When your system restarts:
- Click Troubleshoot > Advanced options > Startup Settings > Restart.
- Press 7.
When your computer restarts, Driver Signature Enforcement will be disabled and you can install the drivers.
-
I am receiving an error when I try to install the drivers in Windows 10 64 bit.
View AnswerDriver Signature Enforcement in Windows 10 may need to be disabled in order to use various drivers. After disabling this feature, the driver will be allowed to install.
Note: You are required to restart your computer after disabling the Driver Signature Enforcement. Save all open work on your computer.
Disable Driver Signature Enforcement:
- Click the Windows icon in the taskbar.
- Click Power.
- Press and hold the Shift key and click Restart.
After your computer restarts:
- Click Troubleshoot > Advanced Options > Startup Settings > Restart.
- Press 7.
When your computer restarts, Driver Signature Enforcement will be disabled and you can install the drivers.
-
Why did the software not install properly in macOS High Sierra (10.13) or later?
View AnswerHigh Sierra 10.13 and later versions of macOS enforce strict security policy revisions. In order for the device to operate, software packages like those used in this installation must be allowed in macOS Security and Privacy settings once the software is installed.
Once the driver/software is installed, follow these steps to allow the software:
- Open System Preferences.
- Open Security & Privacy.
- Click the Allow button near the bottom of the General tab.
Related products


RS-232 | 512 Bytes Receive | 512 Bytes Transmit Superior Build Quality: Housed in a rugged steel chassis with optional mountable flanges, the serial adapter hub…
Model# USBG-8COM-M
$194.95In stock


RS-232 | 128 Bytes Receive | 384 Bytes Transmit | FTDI Expand Your Serial Capabilities: Connect 8 legacy 9-pin serial devices through a USB-A port…
Model# USB-8COM
$197.95Not in stock - Backorder allowed
Sale!


Out of stock
RS232 PCIe module Box A uniquely designed RS232 PCI combination module that supports RS232/422/485 serial signal through a PCI to DB44 cable connection. With DIP…
Model# PCIEMODBOX232
Original price was: $248.95.$230.95Current price is: $230.95.Out of Stock


USB to RS232 Cable Windows 11 The USBG-4X2FTDI 4-Port USB DB-9 Serial Adapter is a rugged plastic USB to Serial adapter that allows you to add 4 RS-232…
Model# USBG-4X2FTDI
$76.95Not in stock - Backorder allowed


RS-232 | 128 Bytes Receive | 384 Bytes Transmit Superior Build Quality: Housed in a rugged steel chassis with built in mountable flanges, the serial adapter…
Model# USB2-8COM-M
$214.95In stock


Serial USB Adapter - Full RS232 Modem Control The USB-32COM-RM USB to 32 Port RS-232 Serial Adapter is designed for industrial applications and harsh environments making serial…
Model# USB-32COM-RM
$659.95In stock


RS232 to Ethernet - Two Port Adapter The MSD-SRF2X Dual port RS-232 to Ethernet data gateway will address the need to add 2 RS-232C devices…
Model# MSD-SRF2XM
$186.95In stock


RS-422 | RS-485 | 384 Bytes Receive | 128 Bytes Transmit Superior Build Quality: Housed in a rugged steel chassis with optional mountable flanges, the…
Model# USBG-2COMi-SI-M
$208.95In stock
Reviews
There are no reviews yet.